In this article
Help us make these docs great!
All rapyuta.io docs are open source. See something that's wrong or unclear? Submit a pull request.
Make a contributionCreating and Applying Configuration on Device
Creating Device Configuration
rapyuta.io allows you to create a dynamic configuration that holds the parameter files in a tree-like hierarchical structure known as a configuration hierarchy. These configuration parameters are applied to the robots to achieve their desired behavior.
To create a dynamic configuration:
-
In the rapyuta.io console, select Development > Configurations > ADD NEW CONFIGURATION.
-
In the Add new configuration pop-up window, enter the configuration name and click CONFIRM The new configuration name is added to the Configuration Name list.
-
To configure the root node, select the configuration name.
-
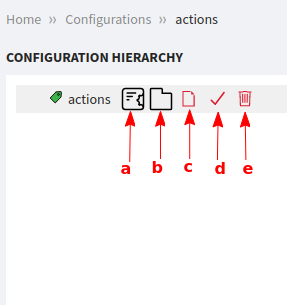
Hover over the root node to view the following additional actions that can be performed:
a. Add attribute - To create an attribute node, select Add attribute, enter the attribute name and click CONFIRM.
b. Add folder - To create a attribute node, select Add folder, enter the folder name and click CONFIRM. For more information, see Folder Node
c. Add file - To Add/upload a base configuration file, select Add file. You can create the configuration parameters in YAML or Binary file format.
d. Apply - To apply the configuration, select the devices to apply configuration and click CONFIRM. For more information, see Applying Configurations to Devices.
e. Delete - To Delete the configuration, select the delete icon and click CONFIRM.
You can add only one attribute node but multiple base configuration files from the root node. You can either add a folder or an attribute to the root node.
Rules for writing YAML configuration parameters
Following are a set of rules that you must adhere to when writing a configuration parameters file:
-
A space character always follows a colon (:) and a hyphen (-). For example,
\# Invalid parameters a:b list: -a -b \# Valid parameters a: b list: - a - b -
Start your configuration parameters file with maps.
\# Invalid parameter file example abc # string \# Invalid parameter file example [a, b] # list \# Valid parameter file example # Invalid parameter file example abc # string # Invalid parameter file example [a, b] # list # Valid parameter file example a: b: c d: e f: - g - h -
If you add a new item to a default list parameter, it is appended to the list.
\# base parameters file list: - a - b \# extending parameters file list: - c \# merged resultant file list: - a - b - c -
If you modify a default parameter’s value, the new value overrides the old value.
\# base parameters file
   a: b
\# overriding parameters file
   a: e
\# merged resultant file
   a: e
Creating a Configuration Parameter in YAML File Format
rapyuta.io allows you to add the configuration parameters at every value node including the root node. You can either write the configuration parameter in YAML format or upload the configurations directly from your local machine.
To create the configuration parameter for a RGV robot in YAML format, create a config parameter, as described here. For example, create a parameter named config_1 and perform the following steps:
-
To configure the root node, select the newly added configuration parameter config_1 from the Configuration Name list.
-
Hover over Config_1 and click Add attribute.
-
In the Create new attribute window, enter the Attribute name, for example Country and click confirm.
-
Hover over Config_1 and click Add file. By default, the file type is selected as YAML. Enter the file name, for example RGV_config and click Confirm.
-
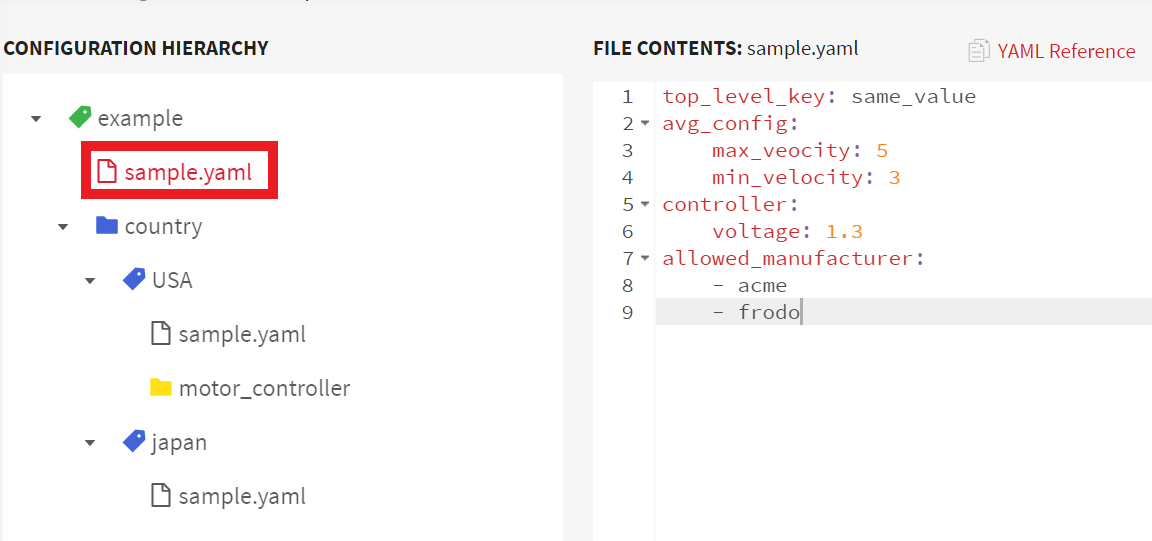
In the File Contents section, enter the RGV robot parameter values, as shown below, and click Save.
While writing or editing the configuration parameter files, ensure you adhere to the rules specified here.
-
Hover over the country attribute to view the options. Click Add Country value to add new value nodes.
-
In the Create new value window, enter a name, for example, USA and click CONFIRM. Similarly, add another country value and give it the name Japan.
-
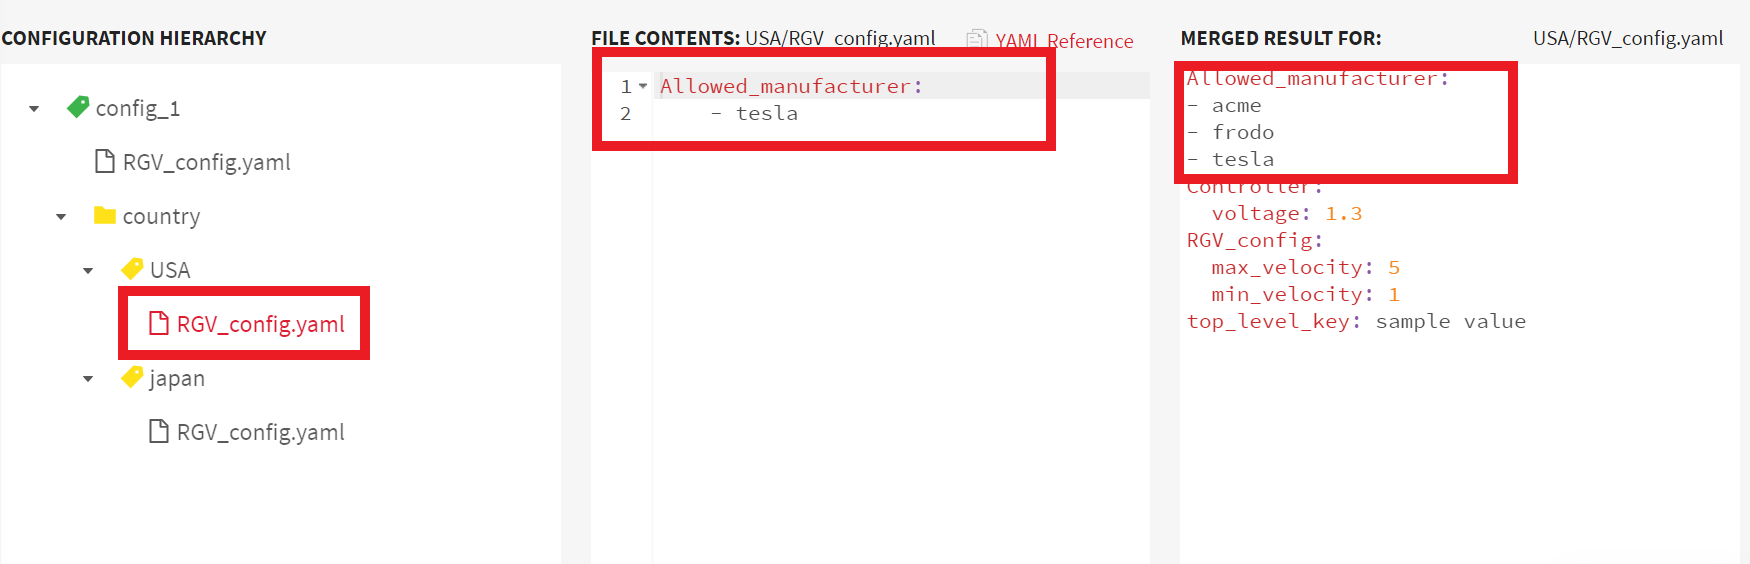
Suppose that the manufacturer Tesla has signed the contract deal to manufacture the RGVs in the USA region. You can add Tesla to the existing list of allowed_manufacturers. You will have to define RGV_Config.yaml for the country value USA, which will extend the list of base parameters. The resultant file after merging the base parameters in config_1/RGV_config.yaml and the newly added parameters in USA/RGV_config.yaml will include tesla in addition to those already present.
-
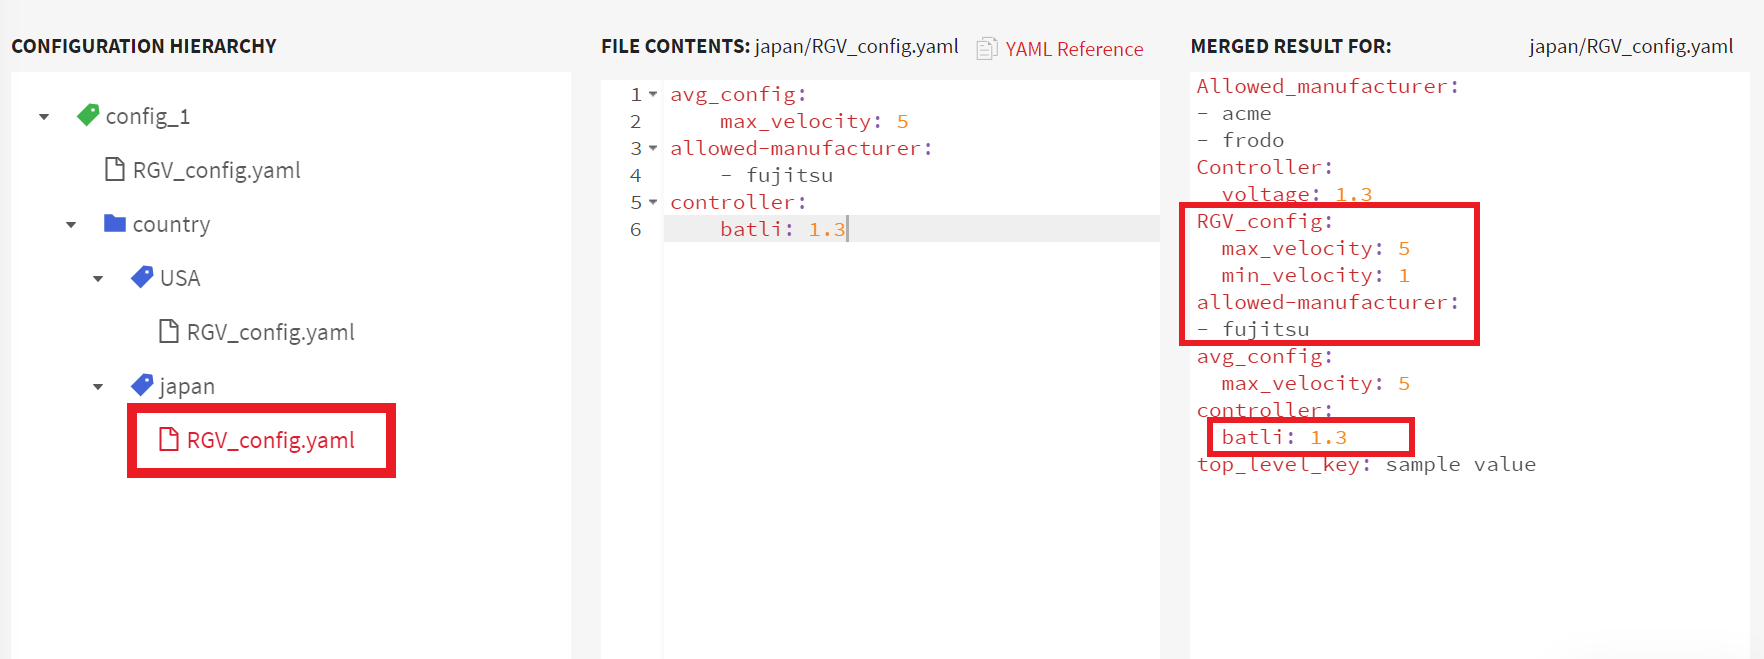
Suppose the regulation in Japan requires you to limit the maximum velocity of a RGV from 5m/s to 3m/s. You can override the max_velocity of the RGV by assigning a new value to it. You will have to define sample.yaml file for the country value Japan. This should include the max_velocity parameter, but with its default overridden. The final parameters file is a result of merging the base parameters (config_1/RGV_config.yaml) and the overridden parameters (Japan/RGV_config.yaml).
Rules for writing JSON configuration parameters
Following are a set of rules that you must adhere to when writing a JSON configuration parameters file:
-
The key-value pairs should be enclosed in curly braces. For example,
Invalid parameters {a} Valid parameters {"a": "b"} -
Only key-value pairs are supported. For example,
Invalid parameters [2,3] Valid parameters {"2": "3"} -
You cannot add an array as the key. For example,
Invalid parameters

 {[2,3]: 5}

Valid parameters

 {"5": [2,3]}
Creating a Configuration Parameter in JSON File Format
rapyuta.io allows you to add the configuration parameters at every value node including the root node. You can add the configuration parameter in JSON format as a key-value pairs.
To create the configuration parameter for a package in JSON format, create a config parameter, as described here. For example, create a parameter named JSON_Config and perform the following steps:
-
To configure the root node, select the newly added configuration parameter JSON_Config from the Configuration Name list.
-
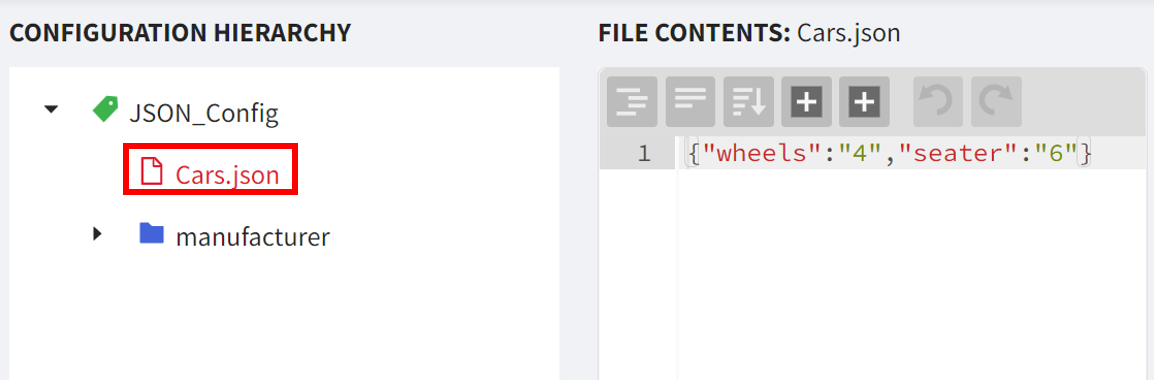
Hover over JSON_Config, click Add file and select JSON. By default, the file type is selected as YAML. Enter the file name, for example, Cars.json, and click Confirm.
-
In the File Contents section, enter the package parameter values, as shown below, and click Save.
-
Hover over JSON_Config and click Add attribute.
-
In the Create new attribute window, enter the Attribute name, for example Manufacturer and click Confirm.
While writing or editing the configuration parameter files, ensure you adhere to the rules specified here.
-
Hover over the Manufacturer attribute to view the options. Click Add manufacturers value to add new value nodes.
-
In the Create new value window, enter a name, for example, Suzuki and click CONFIRM. Similarly, add another manufacturer value and name it Tesla.
-
Hover over Suzuki and click Add file. In the Create new file window, select json from the File type dropdown list. Enter the File name as Cars.json.
-
In the File Contents section, enter the package parameter value as {“seater”:“5”,“type”:“diesel”}, and click Save.
-
Similarly, hover over Tesla and add a file with the package parameter value as {“seater”:“4”,“type”:“electric”}
-
View the merged results for Suzuki which has inherited the key-value pair wheels and and overridden the key-value pair seater from the base parameter file Cars.json

Creating a configuration parameter in Binary file format
A binary file can be in any format, for example, .png, .json, .txt, .jpg, etc. rapyuta.io allows you to upload the configuration file as a binary file. You can upload the configuration file if the configuration file cannot be written in YAML format, for example, a map image.
In the following example, a configuration hierarchy is created with the binary configuration files.
-
Create a parameter named config_1 as described here.
-
In the Add new configuration window, type a name for the configuration and click Confirm. For this example, type the name as config_2. The new configuration name is added to the Configuration Name list. To configure the root node (configuration name), click Config_2 from the list.
-
Hover over Config_2 and click Add attribute, and enter the Attribute name. For example, country.
-
Hover over the country attribute to view the options. Click Add Country value to add new value nodes.
-
In the Create new value window, enter a name, for example, USA and click CONFIRM. Similarly, add another country value and give it the name Japan.
-
Hover over Config_2 and click Add file.
-
In the Create new file window, select Binary from the File type dropdown. Upload a base map image as the binary file from your local machine and click Confirm. If no configuration binary file is added at the file node, the configuration of the base map image is applied to the device.
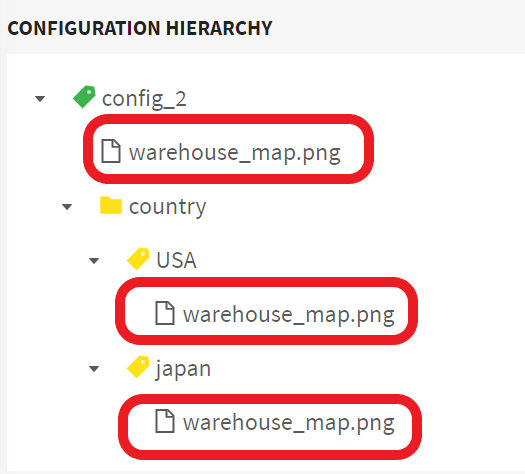
- For the attribute value USA, add the binary configuration file from your local machine and click Confirm. (For this example the map image is warehouse_map ). Similarly, you can upload a binary parameter file for the attribute value japan.
The binary configuration parameter values are saved. The configuration will be applied to the devices after you apply the configuration.
Applying Configuration to Devices
Labels of a device help in associating it with a set of configuration parameters. The configuration parameters are resolved by matching device labels with attributes defined in configuration hierarchies. There are two ways of applying parameters to devices.
-
If you want to apply a set of parameters to multiple devices at once. Hover over the attribute node whose configuration parameter file node you want to apply to a group of devices.
-
Click Apply.
Before applying the configuration parameter, ensure that your device is properly labeled with all the required key-value pairs and the key-value pair matches with the name of attribute and value nodes.
-
If you want to aggregate all parameters across all configuration hierarchies and then apply them to a single device.
a. Select the device from All Devices > Devices on the left navigation bar.
b. Click on Apply Configuration Parameters. The configuration is applied to the device.
Devices must be online.
Related Links
-
For more information about dynamic configuration, click here