In this article
Help us make these docs great!
All rapyuta.io docs are open source. See something that's wrong or unclear? Submit a pull request.
Make a contribution[ROS] Creating Networks
Creating a Routed/Native Network
To create a routed/native network:
- In the rapyuta.io console, on the left navigation bar, select Networking > Networks.
- Click Add Network and select Routed network or Native network and enter:
| Field | Description |
|---|---|
| Name | Enter a name for the routed network. |
| ROS version | Based on ROS version of the package component, select the ROS version from the dropdown. If you select the ROS version as Foxy, you can expand the advanced options to view or modify the Discovery server ID and Discovery server port As Kinetic has reached the EOL, it is suggested to select Melodic as the ROS version while creating a build. |
| Runtime | Select the runtime as Device or Cloud. If you create a device runtime, ensure you have a rapyuta.io registered device with docker runtime and AMD64 architecture available. If you select the device runtime:
|
| Resource limit (applicable only for cloud runtime) | Select the CPU and memory requirement of the network from the dropdown list. These resources are reserved in the platform for effective ROS communication. You can also choose or enter the custom resource limits. For example, 1.025 vCPU and 2.5 GiB Memory. Upper limit for all types of cloud networks: * MaxCloudNetworkCPU: 4 * MaxCloudNetworkMemory: 16384 Lower limit for cloud routed networks: * MinCloudRoutedNetworkCPU: 0.5 * MinCloudRoutedNetworkMemory: 1024 Lower limit for cloud native networks: * MinCloudNativeNetworkCPU: 0.1 * MinCloudNativeNetworkMemory: 512 Granularity: * CPU Granularity: 0.025 cores * Memory Granularity: 128 MB |
- Click CONTINUE. The routed/native network is created.
Deploying a routed network is identical to deploying any other package and has identical corresponding phases and errors. Once the routed network deployment succeeds, other ROS package deployments can bind to it and communicate.
Deleting a Network
Only networks not bound to any running deployments can be deleted. To delete a network:
- On the left navigation bar, click Networking > Networks. A list of available networks is displayed.
- Under Actions, click the delete icon.
An attempt to deprovision a network that is currently being used will result in an error.
Related Links
< The below content will be deleted>
Creating Cloud Routed Network
To create a cloud routed network.
- In the rapyuta.io console, on the left navigation bar, click Networking > Networks.
- Click ADD NEW NETWORK and select the network type as Routed Network. The Create New Routed Network page appears.
- Enter a name for the routed network.
- Select ROS Distro, as either Kinetic or Melodic based on ROS version of package components it will be binding to.
As Kinetic has reached the EOL, it is suggested to select Melodic as the ROS version while creating a build.
- Select the Runtime as Cloud.
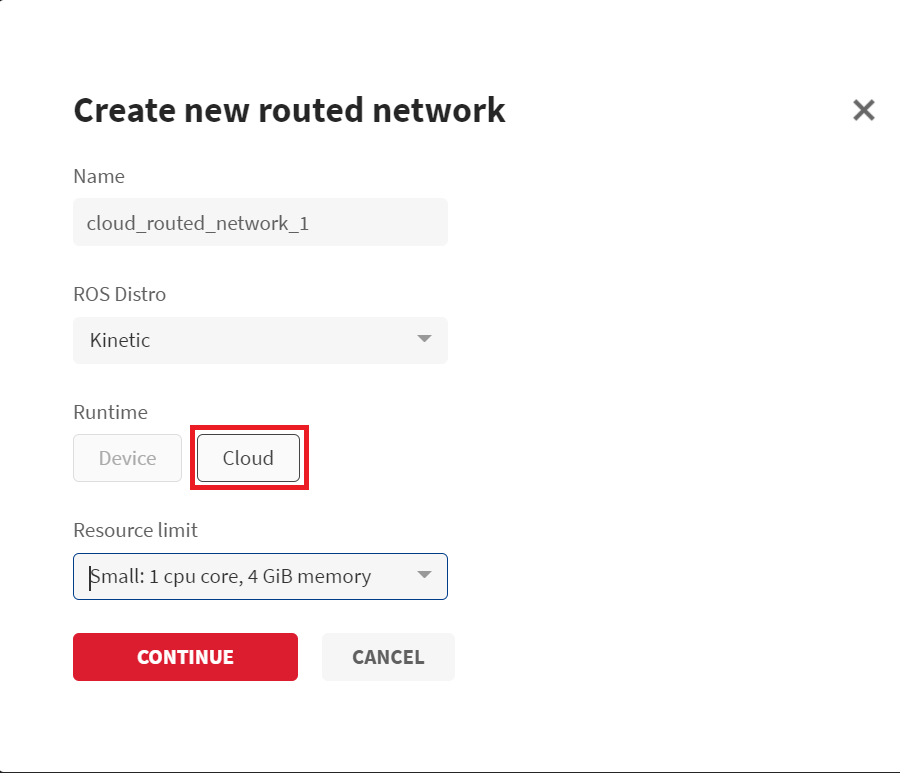
- From the Resource limit field, select the memory allocation and computational ability of the routed network. These resources are reserved in the platform for effective ROS communication. You can select one of the following resource limits based on your requirement.
- Small: 1cpu core, 4 GiB memory
- Medium: 2cpu core, 8 GiB memory
- Large: 4cpu core, 16 GiB memory
- Click CONTINUE. The cloud routed network is created.
Creating Device Routed Network
Follow these steps to create a device routed network. Make sure you have a rapyuta.io registered device with docker runtime and AMD64 architecture available.
- On the left navigation bar, click Networking>Networks.
- Click ADD NEW NETWORK and select the network type as Routed Network. The Create new routed network dialog-box appears.
- Enter a name for routed network.
- Select ROS Distro, as either Kinetic or Melodic based on ROS version of package components it will be binding to.
- Select the Runtime as Device.
- You will see a list of the online device with docker runtime and AMD64 architecture in the drop-down list. Select the Device and its IP Interface.
- Select the Restart policy. Available options are Never, Always, or On Faiure.
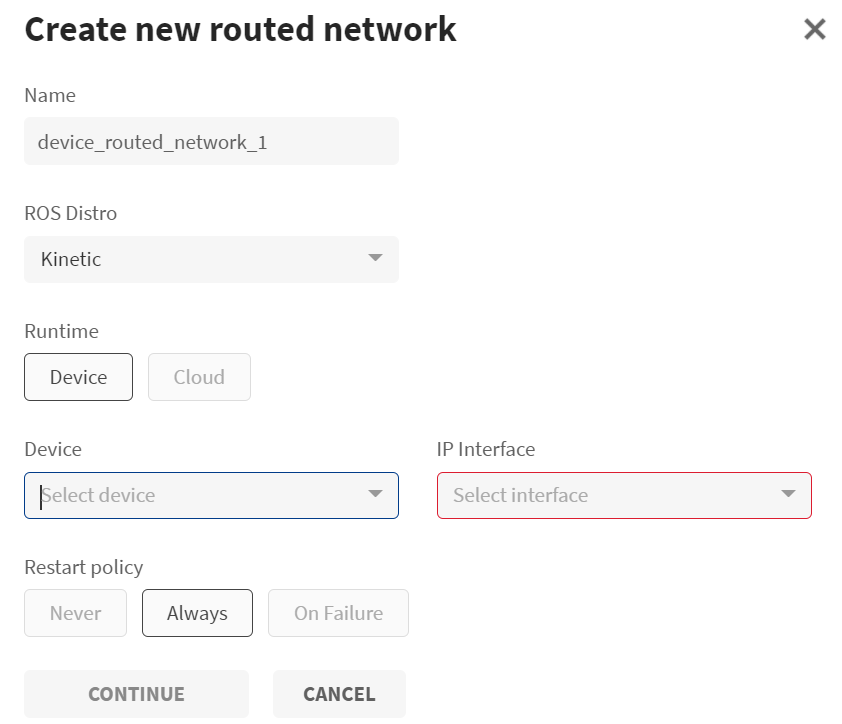
- Click CONTINUE. The device routed network is created.
Deploying a routed network is identical to deploying any other package and has identical corresponding phases and errors.
Once the routed network deployment succeeds, other ROS package deployments can bind to it and communicate.

Creating Native Network
Follow these steps to create a native network.
- On the left navigation bar, click Networking>Networks.
- Click ADD NEW NETWORK and select the network type as Native Network. The Create new native network dialog-box appears.
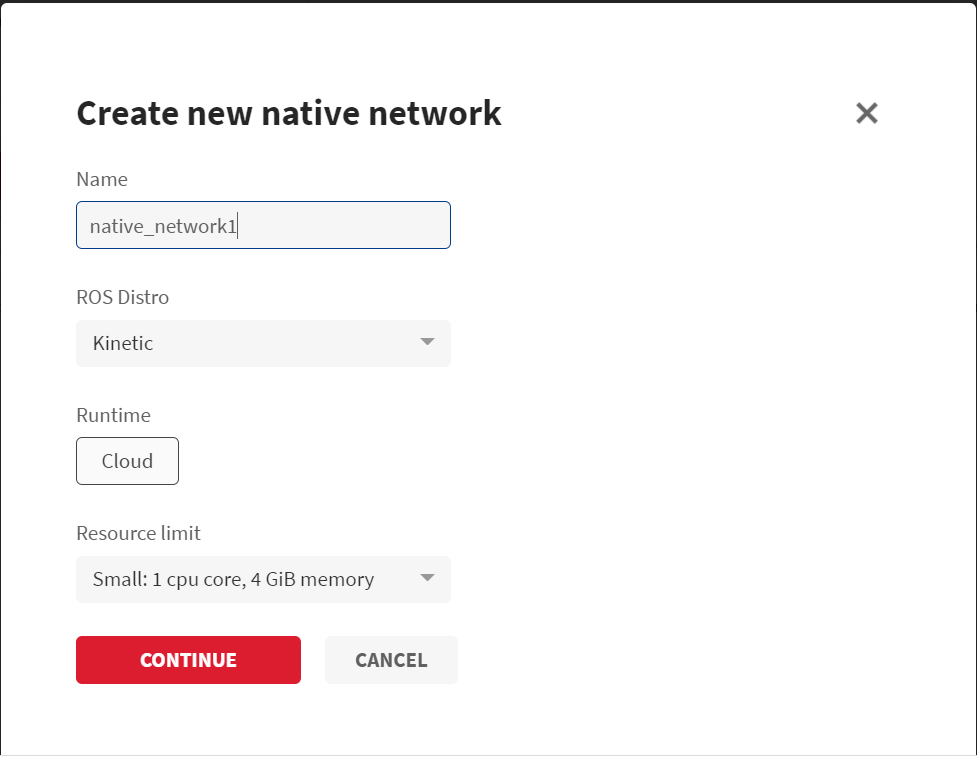
- Enter a name for the native network.
- Select ROS Distro as either Kinetic or Melodic based on ROS version of package components it will be binding to.
- By default, the Runtime is Cloud.
- From the Resource limit field, select the memory allocation and computational ability of the native network. These resources are reserved in the platform for effective ROS communication. You can select one of the following resource limits based on your requirement.
- X-Small: 0.5cpu core, 2 GiB memory
- Small: 1cpu core, 4 GiB memory
- Medium: 2cpu core, 8 GiB memory
- Large: 4cpu core, 16 GiB memory
- Click CONTINUE. The native network is created. <–>