In this article
Help us make these docs great!
All rapyuta.io docs are open source. See something that's wrong or unclear? Submit a pull request.
Make a contributionOn-boarding a Device
Pre-requisites
- Mandatory
- Python >=2.7.8, < 3 or Python >=3.6, <=3.9
- Ubuntu 16.04 (Xenial Xerus)
- Ubuntu 18.04 (Bionic Beaver) or Ubuntu 20.04 (Focal Fossa)
- Optional
- curl
- Robot Operating System (ROS)
- Kinetic Kame, Melodic Morenia, or Noetic Ninjemys
- By default, Ubuntu(16.04 and 18.04) resolves the hostname to localhost. If this is changed on the host OS, roscore will not start.
- To check if roscore starts, do
nslookup $(hostname), this should return a DNS record.
rapyuta.io Runtimes
- rapyuta.io supports docker and preinstalled runtime.
- By default, the docker runtime is enabled.
- You can enable both the runtimes for a device at once.
- You can enable/disable the runtime during the lifetime of a device.
- A device should always have one runtime enabled. For more information, see Understand Runtimes.
Register a New Device
To register a new device on rapyuta.io:
- In the left navigation bar, click Devices > All Devices.
- Click ADD NEW DEVICE and enter:
Field Description Device Name Enter a name for the device. Description Enter a summary of the device. Advanced Expand this option to view additional configurations. Docker The primary runtime for managing applications through Docker. Select this option and specify the ROSBag mount path. By default, docker runtime is enabled for a device.
Preinstalled The secondary runtime available for managing pre-installed software on the device. Select this option and specify the ROS Catkin Workspace. Preinstalled devices can now be created even if ros distro is not available on the device, but the ros communication packages for preinstalled runtime will not be installed and you will not be able to create a network.
Rosbag mount path Enter the path to store the ROS bag files on the device. The default path is /opt/rapyuta/volumes/rosbag. After you onboard a device, you cannot change the mount path to store the ROS bag files. If you want to change the mount path after adding the device, you can re-onboard the device and change the mount path.
ROS Catkin Workspace Enter the absolute path of your catkin workspace. If you are using a custom rapyuta.io image on the device, your catkin workspace will be /home/rapyuta/catkin_ws where catkin_ws is the name of the catkin workspace. Otherwise, you will have a different absolute path for your catkin workspace. The ROS Catkin Workspace value can be empty, and you can provide this value on the device’s details page.
- Click Add device.
On clicking Add device, a script is copied to your clipboard. You can run this script to set up the device. For more information, see Setting Up your Device.
The copied script is valid only for 10 minutes.
- Click Add device.
To create a project:
rio device create <device_name>
--runtime <device_runtime>
--ros <ros_distro>
--python <python_version>
Enable a Preinstalled/Docker Runtime for an Onboarded Device
- Select the onboarded device and navigate to the device details page.
- Under the config variables section:
- For preinstalled device: set the value of the runtime_preinstalled variable to True.
- For a ros-based preinstalled runtime deployment: set the value of the ros_distro variable to the value of the ros distro present in your device.
If the ros distro variable is not set, communication over the network (native network or routed network) will not happen and deployments that depend on these networks will fail.
- For a docker device: set the value of the runtime_docker variable to True.
- SSH into the device and run
sudo systemctl restart rapyuta-agent. You can check the status on the device details page. - Once re-onboarded, you should be able to deploy the docker/preinstalled runtime-based packages.
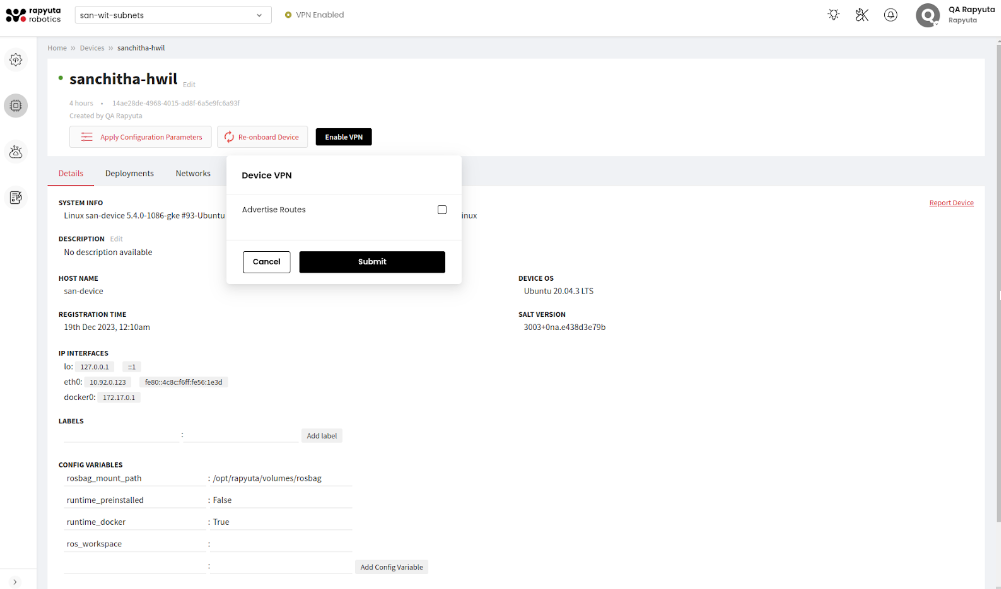
Enable VPN for Online Devices
-
Select the device and navigate to the device details page.
-
To enable/disable VPN, click the Enabled/Disabled button. For more information, see Enabling VPN Services
Setting Up your Device
Set up your device to connect it to the rapyuta.io platform. To set up your device, open the command terminal and run the previously copied script. The token sets up the rapyuta.io device client on the device.
- Sometimes, you may need root permission to execute the token on the device.
- Access the command terminal of the device physically using a screen and keyboard, through SSH, or any other serial TTY method available.
Once the device is set up successfully, you should see the following output on the command terminal:
Initializing the Rapyuta Platform

########(100%)

Successfully installed!

root@ubuntu:/home/ubuntu#
Following are the different stages involved in installing and onboarding the device onto rapyuta.io platform:
- Checking and installing the required python or apt packages.
- Installing ROS messages collector package.
- Installing communication package.
- Installing metrics collector package.
- Installing monitoring package.
- Pulling ROS base image.
Not all devices go through all of the stages in the device initialization process. For example, devices with docker-compose option set will have ROS base image installed on them, those with preinstalled runtime will have monitoring package installed on them.
In case you face issues onboarding the device. Please refer to the section on failure codes to help you troubleshoot.
When the device is successfully registered, you will see a green dot beside the device’s name, this indicates that the device is online.
Upgrade Your Device
The rapyuta.io platform allows you to upgrade your python 2 devices to python 3. To upgrade your device:
- On the device details page, click Upgrade Device.
- Click Confirm. The device is successfully upgraded to python 3.
After you upgrade your device to python 3, you must set up the device for the changes to reflect.